Wednesday 25 June 2014
Antivirus Soft Uninstall Help – How to Uninstall Antivirus Soft Completely
What is Antivirus Soft?
Antivirus Soft is rogue program, which recently infects millions of computers. Like many other fake antivirus programs, Antivirus Soft can not provide any protection to your computer. All it what to do is convince you that your PC need it to remove various computer threats. In fact, all you should do is to remove Antivirus Soft as soon as possible.
Why I have to uninstall Antivirus Soft?
Antivirus Soft is quite powerful and many security programs can not remove it completely. The rogue program constantly opens a backdoor to virus and Trojan and renders your system at risk. If your security program fail to remove the rogue program, you should try to uninstall it completely.
How to uninstall Antivirus Soft manually?

1) Find the “start” button on the lower left corner of your monitor, and then click it.
2) Find and double click the button “Control Panel”.
3) Find “Add / Remove Program” icon in the control panel, and then double click it.
4) Find the Antivirus Soft icon in the list, and then select it to start uninstalling it from your computer.
Don’t be too happy when you finished all these four steps, because for some reasons, Antivirus Soft will be failed to be uninstalled because some reasons and this happen often. If you came up with this problem, I am afraid you have to uninstall Antivirus Soft from your computer’s registry.
You are not suggested to try this method manually for it is difficult to discriminate which registry belongs to Antivirus Soft, and which one not. Forgetting to delete one of Antivirus Soft’s registries will remain Antivirus Soft in your computer. The worse situation is that when you mis-delete even if one registry which not belong to Antivirus Soft, but it is crucial for the system, you will mess up your computer. That will be a nightmare, right?
A professional uninstall software can save your time and prevent you from messing up your PC. It will dig into the system to find out Antivirus Soft’s corresponding registry one by one, and then delete them together and completely. Antivirus Soft will be removed from your computer completely through this method. Compared with so much searching work, you just need to click your mouse several times to uninstall Antivirus Soft from your PC by using Perfect Uninstaller.
Now move your mouse here, take the first click to free download Perfect Uninstaller to your computer. And Antivirus Soft will be disappeared completely from your computer after several minutes.
Antivirus Soft is rogue program, which recently infects millions of computers. Like many other fake antivirus programs, Antivirus Soft can not provide any protection to your computer. All it what to do is convince you that your PC need it to remove various computer threats. In fact, all you should do is to remove Antivirus Soft as soon as possible.
Why I have to uninstall Antivirus Soft?
Antivirus Soft is quite powerful and many security programs can not remove it completely. The rogue program constantly opens a backdoor to virus and Trojan and renders your system at risk. If your security program fail to remove the rogue program, you should try to uninstall it completely.
How to uninstall Antivirus Soft manually?
1) Find the “start” button on the lower left corner of your monitor, and then click it.
2) Find and double click the button “Control Panel”.
3) Find “Add / Remove Program” icon in the control panel, and then double click it.
4) Find the Antivirus Soft icon in the list, and then select it to start uninstalling it from your computer.
Don’t be too happy when you finished all these four steps, because for some reasons, Antivirus Soft will be failed to be uninstalled because some reasons and this happen often. If you came up with this problem, I am afraid you have to uninstall Antivirus Soft from your computer’s registry.
You are not suggested to try this method manually for it is difficult to discriminate which registry belongs to Antivirus Soft, and which one not. Forgetting to delete one of Antivirus Soft’s registries will remain Antivirus Soft in your computer. The worse situation is that when you mis-delete even if one registry which not belong to Antivirus Soft, but it is crucial for the system, you will mess up your computer. That will be a nightmare, right?
A professional uninstall software can save your time and prevent you from messing up your PC. It will dig into the system to find out Antivirus Soft’s corresponding registry one by one, and then delete them together and completely. Antivirus Soft will be removed from your computer completely through this method. Compared with so much searching work, you just need to click your mouse several times to uninstall Antivirus Soft from your PC by using Perfect Uninstaller.
Now move your mouse here, take the first click to free download Perfect Uninstaller to your computer. And Antivirus Soft will be disappeared completely from your computer after several minutes.
Infected bySafeGuard 2009? – How to Get Rid of SafeGuard 2009 Safely and Easily
What is SafeGuard 2009?
SafeGuard 2009 is rogue program, which recently infects millions of computers. Like many other fake antivirus programs, SafeGuard 2009 can not provide any protection to your computer. All it what to do is convince you that your PC need it to remove various computer threats. In fact, all you should do is to remove SafeGuard 2009 as soon as possible.
Why I have to uninstall SafeGuard 2009?
SafeGuard 2009 is quite powerful and many security programs can not remove it completely. The rogue program constantly opens a backdoor to virus and Trojan and renders your system at risk. If your security program fail to remove the rogue program, you should try to uninstall it completely.
How to uninstall SafeGuard 2009 manually?
1) Find the “start” button on the lower left corner of your monitor, and then click it.
2) Find and double click the button “Control Panel”.
3) Find “Add / Remove Program” icon in the control panel, and then double click it.
4) Find the SafeGuard 2009 icon in the list, and then select it to start uninstalling it from your computer.
Don’t be too happy when you finished all these four steps, because for some reasons, SafeGuard 2009 will be failed to be uninstalled because some reasons and this happen often. If you came up with this problem, I am afraid you have to uninstall SafeGuard 2009 from your computer’s registry.
You are not suggested to try this method manually for it is difficult to discriminate which registry belongs to SafeGuard 2009, and which one not. Forgetting to delete one of SafeGuard 2009’s registries will remain SafeGuard 2009 in your computer. The worse situation is that when you mis-delete even if one registry which not belong to SafeGuard 2009, but it is crucial for the system, you will mess up your computer. That will be a nightmare, right?
A professional uninstall software can save your time and prevent you from messing up your PC. It will dig into the system to find out SafeGuard 2009′s corresponding registry one by one, and then delete them together and completely. SafeGuard 2009 will be removed from your computer completely through this method. Compared with so much searching work, you just need to click your mouse several times to uninstall SafeGuard 2009 from your PC by using Perfect Uninstaller.
Now move your mouse here, take the first click to free download Perfect Uninstaller to your computer. And SafeGuard 2009 will be disappeared completely from your computer after several minutes.
Tuesday 24 June 2014
Anti-Virus&Trojan Uninstall Help – How to Uninstall Anti-Virus&Trojan Completely
What is Anti-Virus&Trojan?
Anti-Virus&Trojan is an umbrella term for range of antivirus and Internet security software which is developed by Anti-Virus&Trojan Technologies, a Czech company formerly known as Grisoft. Anti-Virus&Trojan is wildly used on all kinds of operating system such as Microsoft Windows, Linux, and FreeBSD computing platforms.
Why I have to uninstall Anti-Virus&Trojan?
Anti-Virus&Trojan is famous for its prominent ability in detecting virus. And this ability is based on the frequent upgrade of its database. the upgrade is so often that each time you reboot your computer you will new feature s waiting to be added to the Anti-Virus&Trojan. Some customers complain that the upgrading process regularly fail to complete so that have to finish manually. What’s more, there are also some customers complaining Anti-Virus&Trojan using up too many resources and various features of Anti-Virus&Trojan are incompatible with Windows Vista
How to uninstall Anti-Virus&Trojan manually?
1) Find the “start” button on the lower left corner of your monitor, and then click it.
2) Find and double click the button “Control Panel”.
3) Find “Add / Remove Program” icon in the control panel, and then double click it.
4) Find the Anti-Virus&Trojan icon in the list, and then select it to start uninstalling it from your computer.
Don’t be too happy when you finished all these four steps, because for some reasons, Anti-Virus&Trojan will be failed to be uninstalled because some reasons and this happen often. If you came up with this problem, I am afraid you have to uninstall Anti-Virus&Trojan from your computer’s registry.
You are not suggested to try this method manually for it is difficult to discriminate which registry belongs to Anti-Virus&Trojan, and which one not. Forgetting to delete one of Anti-Virus&Trojan’s registries will remain Anti-Virus&Trojan in your computer. The worse situation is that when you mis-delete even if one registry which not belong to Anti-Virus&Trojan, but it is crucial for the system, you will mess up your computer. That will be a nightmare, right?
A professional uninstall software can save your time and prevent you from messing up your PC. It will dig into the system to find out Anti-Virus&Trojan’s corresponding registry one by one, and then delete them together and completely. Anti-Virus&Trojan will be removed from your computer completely through this method. Compared with so much searching work, you just need to click your mouse several times to uninstall Anti-Virus&Trojan from your PC by using Perfect Uninstaller.
Now move your mouse here, take the first click to free download Perfect Uninstaller to your computer. And Anti-Virus&Trojan will be disappeared completely from your computer after several minutes.
Uninstall Ad-Aware 2009 – How to Uninstall Ad-Aware 2009 Entirely
Description: How to uninstall Ad-Aware 2009? Ad-Aware 2009 is a common program that can be used to ensure you a convenient PC life. Ad-Aware 2009 is developed by Adobe Systems Incorporated, a world leading software developer. Even if Ad-Aware 2009 has the ability to offer you a series of functions to make it far more comprehensive to run a PC than other brands of flash players, you have to uninstall it as soon as possible when the situations occur:
If you have to uninstall Ad-Aware 2009, we sincerely suggest you firstly apply the manual removal method. You can follow the easy steps to uninstall Ad-Aware 2009:
Recommended: Uninstall Programs Successfully Here

How to uninstall Ad-Aware 2009 entirely?
If you have to uninstall Ad-Aware 2009, the best method is to enable a highly praised Ad-Aware 2009 uninstaller on your computer. It aids in fully uninstalling Ad-Aware 2009 and any other kinds of non removal software via its built- in revolutionary uninstall utility combined with ultra comprehensive system optimization tools. The highly praised Ad-Aware 2009 uninstaller offers you with a far more effective uninstall journey than other brands of uninstaller, because:
If you have to uninstall Ad-Aware 2009 , we highly recommend you to follow the simplest methods below to enable the ultra powerful Ad-Aware 2009 uninstaller:
1. Free download Perfect Uninstaller here.
2. Double click to finish the installation.
3. Highlight “Ad-Aware 2009” in a “Display Name” list and then select “Uninstall” to finish the uninstall process.
4. Follow the instructions on the screen to completely uninstall Ad-Aware 2009.
- You cannot update Ad-Aware 2009 to the latest version.
- The related files with Ad-Aware 2009 are damaged maliciously by malware and cannot be invoked smoothly to run Ad-Aware 2009 .
- Another flash player is not compatible with Ad-Aware 2009.
- Due to its vulnerability problems, Ad-Aware 2009 sometimes keeps crashing or eats up a lot of resources to run on your computer that can drastically slow down your PC, degrade overall system performance and lead to software instability.
- Some integrated files of Ad-Aware 2009 run at the background and system startup which may lead to silent malware intrusion.
If you have to uninstall Ad-Aware 2009, we sincerely suggest you firstly apply the manual removal method. You can follow the easy steps to uninstall Ad-Aware 2009:
- Click Start menu, and then run Control Panel.
- Select the Add or Remove Programs option.
- In the Currently installed programs list, click Ad-Aware 2009 option.
- Select Ad-Aware 2009 in the Add/Remove program list, and then click the Remove button to manually uninstall Ad-Aware 2009.
Recommended: Uninstall Programs Successfully Here
How to uninstall Ad-Aware 2009 entirely?
If you have to uninstall Ad-Aware 2009, the best method is to enable a highly praised Ad-Aware 2009 uninstaller on your computer. It aids in fully uninstalling Ad-Aware 2009 and any other kinds of non removal software via its built- in revolutionary uninstall utility combined with ultra comprehensive system optimization tools. The highly praised Ad-Aware 2009 uninstaller offers you with a far more effective uninstall journey than other brands of uninstaller, because:
- The ultimate solution empowers you to completely uninstall Ad-Aware 2009 and any other kinds of software, add- on, plug- in, context manual, unwanted programs and malicious applications and entirely wipe out protected file associations, non- removal empty registry keys, embedded registry keys, invalid application paths, obsolete file extensions, invalid program shortcuts and corrupted startup programs, to ensure you an error- free PC.
- It can successfully perform any uninstall tasks with a highly user –friendly interface.
- It shows detailed information of each program and application installed on your PC.
If you have to uninstall Ad-Aware 2009 , we highly recommend you to follow the simplest methods below to enable the ultra powerful Ad-Aware 2009 uninstaller:
1. Free download Perfect Uninstaller here.
2. Double click to finish the installation.
3. Highlight “Ad-Aware 2009” in a “Display Name” list and then select “Uninstall” to finish the uninstall process.
4. Follow the instructions on the screen to completely uninstall Ad-Aware 2009.
Monday 23 June 2014
KeyScrambler Removal – What Can You Do to Fully Remove KeyScrambler from Your PC
Having problems in uninstalling KeyScrambler? It does not allow to be deleted by using the built-in Windows uninstaller? It is so annoying when you tried to remove KeyScrambler and you failed. The most important is that you have not fully deleted all files. They are corrupted and make your PC run freezing. So you have to learn and follow the removal guides to totally get rid of the program.
If you have added the browser to the Start menu, you can find directory of KeyScrambler Personal in All programs and you just need to choose the option of Uninstall KeyScrambler Personal.
If you cannot find the program in All Programs, go to the folder where you keep the KeyScrambler Personal, find the Uninst executable program and then follow the instruction to remove the browser.
It is recommended to restart your computer after the un-installation finishes.
How to remove the KeyScrambler Personal by using Add or Remove Programs utility in the Control Panel?
Choose Start menu and select Run.
Type in “appwiz.cpl” in the dialog box and select “ok”.
Click the KeyScrambler Personal in the program list and then select “delete”.
Follow the onscreen steps to finish the removal of it.
Or you can try the other much easier way to uninstall KeyScrambler Personal. It is also a trend to use a professional uninstall tool to uninstall unwanted programs. Since it is specifically designed to totally uninstall programs that standard uninstaller cannot, Perfect Uninstaller is highly recommended for you.
Perfect Uninstaller is faster, easier to uninstall KeyScrambler Personal or remove CA Anti-Spam 2009 than other uninstall tool.
What is the KeyScrambler?
KeyScrambler Personal is a free plug-in for your Web browser that protects everything you type from keyloggers. It defeats keyloggers by encrypting your keystrokes at the keyboard driver level, deep within the operating system. When the encrypted keystrokes reach your browser, KeyScrambler then decrypts them so you see exactly the keys you’ve typed. Keyloggers can only record the encrypted keys, which are completely indecipherable. Unlike anti-virus and anti-spyware programs that depend on recognition to remove keyloggers that they know about, KeyScrambler will protect you from both known and unknown keyloggers.How to uninstall KeyScrambler Personal by the built-in installer tool?
Most programs would contain a built-in tool for you to install or uninstall them easily. You could find the tool in the folder where KeyScrambler Personal has been installed in.If you have added the browser to the Start menu, you can find directory of KeyScrambler Personal in All programs and you just need to choose the option of Uninstall KeyScrambler Personal.
If you cannot find the program in All Programs, go to the folder where you keep the KeyScrambler Personal, find the Uninst executable program and then follow the instruction to remove the browser.
It is recommended to restart your computer after the un-installation finishes.
How to remove the KeyScrambler Personal by using Add or Remove Programs utility in the Control Panel?
Choose Start menu and select Run.
Type in “appwiz.cpl” in the dialog box and select “ok”.
Click the KeyScrambler Personal in the program list and then select “delete”.
Follow the onscreen steps to finish the removal of it.
Or you can try the other much easier way to uninstall KeyScrambler Personal. It is also a trend to use a professional uninstall tool to uninstall unwanted programs. Since it is specifically designed to totally uninstall programs that standard uninstaller cannot, Perfect Uninstaller is highly recommended for you.
Perfect Uninstaller is faster, easier to uninstall KeyScrambler Personal or remove CA Anti-Spam 2009 than other uninstall tool.
What Can I Do to Fully Uninstall StealthNet When You Don’t Need It
Do you want to fully uninstall StealthNet when you don’t need to use it? Do you feel helpless when you try to delete StealthNet but you can’t do that? Don’t worry. It is not difficult if you follow the StealthNet removal tips in this article. Before you delete the program, you should know something about it.
StealthNet P2P is your all in one solution to all of your files sharing needs. While it can be used to download free songs, videos, games, StealthNet can be used to create, upload, and download torrents. Recently,it has been added a optimization plug-in that no other software has. This plugin increases download speeds by over 50%. Best of all, this is free and will always remain free. Although we appreciate your donations; there is no paid version.
The way to remove StealthNet P2P with default uninstaller
Alternatively, if the StealthNet application is open, choose File > Exit.
On the Windows taskbar, choose Start > All Programs > StealthNet > Uninstall StealthNet.
The Initializing Wise Uninstall Wizard screen appears briefly.
Click “Next” on the Installation Wizard and the software removal process begins.
Remove StealthNet P2P of related files
Open Search to make a full search for StealthNet related files.(When you open it, please keep in mind to select Local Hard Drives as your search scale.)
Delete all the files it shows before you.
Turn to Start Menu and then go to Run.
Enter regedit and then click OK to open Registry Editor.
Under folder HKEY_CURRENT_USER and HKEY_LOCAL_MACHINE, you will find StealthNet related entries. Please delete them once for all.
Lastly, reboot your PC.
In fact, to uninstall StealthNet completely, you can use a powerful, professional uninstall tool. Perfect Uninstaller is highly recommended for you. You can uninstall StealthNet easily and remove BearShare 10.0 completely with Perfect Uninstaller. What’s more, it enables you to remove all hidden leftovers related to StealthNet and thus keep you from future trouble.
Download and Run the Perfect Uninstaller to Uninstall StealthNet
Double click on the Perfect Uninstaller icon to start the tool.
Locate the program on the display list. Follow the on-screen instructions to complete the removal.
Finally, you just need to reboot your computer and StealthNet will be fully uninstalled.
Sunday 22 June 2014
Uninstall WOT addon – Tips to Uninstall WOT addon
WOT(Web Of Trust) known as an internet security add-on for web browser which claims to help you keep away from insecure website, but it has been reported as a kind of adware by other third party internet security programs as its jumbled rating & estimating system usually delivery wrong and misleading messages, and this add-on will slow down the speed of the website browsing as well. If you have installed WOT add-on, it is suggested to uninstall it from your browser for the good sake.

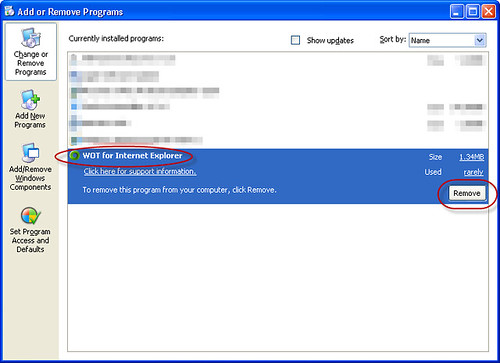
As this add-on will not displayed in the “Start—Programs” list, we have to reach the control panel to delete it. Here is the detailed demonstration.
Step1: Double click “My computer”
Step2: Click “control panel”
Step3: Click “Add or Remove Programs”
Step4: Locate “WOT Internet Explorer” in the add/remove list and click the “remove” button.
If the above steps fail to delete WOT, we recommend you to apply the professional uninstall program—-Perfect Uninstaller, which will help you to uninstall all the unwanted program/applications that are hard to be removed by normal procedure.
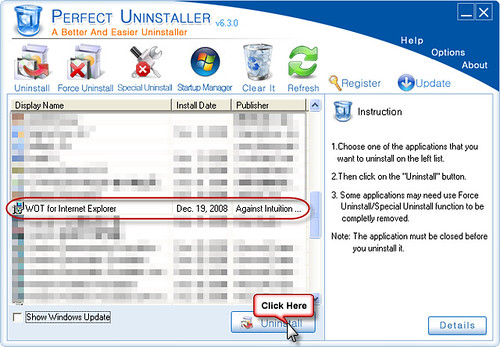
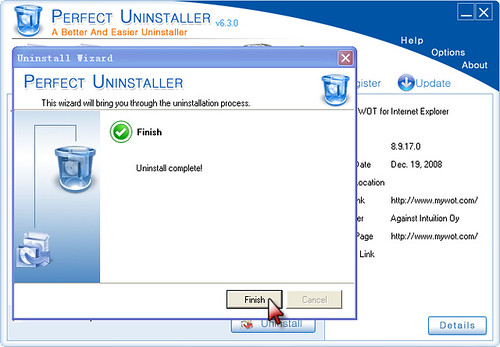
Completely remove WOT add-on by Perfect Uninstaller:

Notice: Please make sure to turn off IE browser before processing the uninstall
Step1: Open Perfect Uninstaller
Step2: Locate “WOT for Internet Explorer” in the uninstall list.
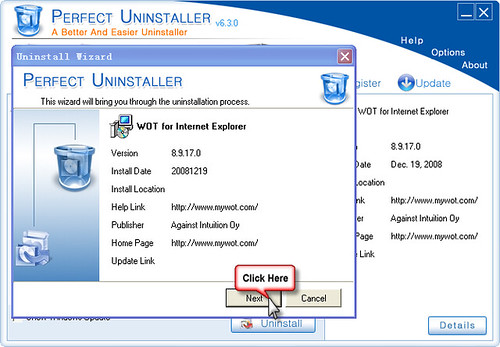
Step3: Click the “uninstall” button.
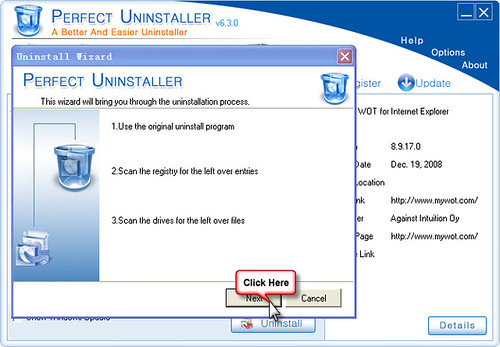
Step4: Click next and follow the on screen instruction to remove the program.
As this add-on will not displayed in the “Start—Programs” list, we have to reach the control panel to delete it. Here is the detailed demonstration.
Step1: Double click “My computer”
Step2: Click “control panel”
Step3: Click “Add or Remove Programs”
Step4: Locate “WOT Internet Explorer” in the add/remove list and click the “remove” button.
If the above steps fail to delete WOT, we recommend you to apply the professional uninstall program—-Perfect Uninstaller, which will help you to uninstall all the unwanted program/applications that are hard to be removed by normal procedure.
Completely remove WOT add-on by Perfect Uninstaller:
Notice: Please make sure to turn off IE browser before processing the uninstall
Step1: Open Perfect Uninstaller
Step2: Locate “WOT for Internet Explorer” in the uninstall list.
Step3: Click the “uninstall” button.
Step4: Click next and follow the on screen instruction to remove the program.
How to Edit Registry
Caution: Backup your registry information first; it is easy to make your PC crash if you edit your registry list.
For Windows XP:
1. In Windows XP, from Start, and then click on Run.
2. Type “regedit”, then click on OK.
3. Now it opens the Registry Editor
4. Click on Export Registry.
5. Select “All” option for backing up every key of registry.
6. Give a destination file (say Regbackup) and save it on to the Desktop.
7. You can easily navigate through the subkey if you know what you are looking for. Or, you can press “Ctrl + F” to locate the subkey that contains the value you want to edit. (F3 to Find Next)
8. Under this key, there will be the subkeys (some may be absent, which is normal)
9. Click on each Version key to find contents in the right-window pane.
10. Delete all the sub-keys inside.
11. From File menu, click exit.
For Windows Vista:
1. From Start, then type “regedit“.
2. Click on “regedit” on the search result to open the registry editor in Windows Vista.
3. Steps are the same as Windows XP (see above).
Now you have been able to remove registry entries from your computer now.
Thursday 19 June 2014
Dr.Web Uninstall Tips – How to Uninstall Dr.Web from Windows Completely Instantly
What is Dr.Web?
Dr.Web is antivirus and Anti-Hacker security software which is developed by Dr.Web Lab. Dr.Web provides real-time protection on your computer’s system through scanning everything read, written to or executed on your hard drive. Dr.Web is one of the top antivirus software in the world as it can detect more than 98% of all known virus.
Why I have to uninstall Dr.Web?
However, there are some computer users who are so scared of virus so they install as much antivirus software to their computer as possible.
No long after that, their PCs run slower and slower, and they will think this hindrance in speed due to virus. But in fact, too much antivirus software in your computer will also slow down your computer for they use so many of your computer’s memory and recourse. So when some customers have to make a choice from so much antivirus software, they will choose to uninstall Dr.Web.
How to uninstall Dr.Web manually?
Click “Start” > “Control Panel” > “Add or Remove Programs”, select the files of Dr.Web and click “Remove”. This is the most common method to uninstall Dr.Web, but sometimes it is still difficult to uninstall its components completely as they are embedded with your system so well. You even have to reboot your computer to repeat these steps again and again to uninstall Dr.Web completely. And there still have a few customers complaining even they repeated enough.
Or you can make a better choice-uninstall Dr.Web with the help of Perfect Uninstaller. Perfect Uninstaller will scan all of your drives to find out all files, file folders or even registries which are related to Dr.Web. And then you can uninstall Dr.Web by pushing only one button.
Yes, you don’t have to enter into registry to delete anything by yourself, you don’t have to reboot your computers so many times to uninstall Dr.Web form your computer. You just need to click your mouse several times, and Dr.Web will be removed completely from your computer after a few minutes.
Now, don’t delay anymore, move your mouse here to make the first click to free download Perfect Uninstaller to your computer!
Uninstall CS3 – Uninstalling Adobe Photoshop CS3
 Adobe CS3, namely Adobe Photoshop CS3, is commonly used for editing and creating high quality pictures. It is equipped with the ability to work more productively, edit with unrivalled power, and composite with breakthrough tools. In the other side, there have been reports that it is not as user-friendly as it claims to be, and getting it out of your computer may be difficult too.
How to Uninstall Adobe Photoshop CS3 Correctly?
It is of great importance to know that when Adobe CS3 is removed from computer system, certain elements and counter-parts of it might have been corrupted or damaged and left in your system, causing the system to have further problems. In that sense, if you haven’t successfully deleted this program and the files that it may have left behind, the remnants of this program will likely trigger more issues.
So, you have to know what you need to be able to do to get rid of any parts of the software that you may have inside your system. The good news is that you can use the steps outlined here to uninstall Adobe CS3 in the most effective way possible.
Manually Uninstall Photoshop CS3
The most common way that people uninstall Photoshop CS3 is to use the “Add / Remove Programs” feature of Windows – a central feature of all Windows systems which has been designed to help you get rid of any of the applications that you have on your system. Here’s how to use this program:
Click “Start”, then click onto “Control Panel”
Locate “Add / Remove Programs” (Windows XP) or “Uninstall A Program” (Windows 7)
When this applet loads up, select “Adobe Photoshop CS3″ from the list that appears
Click “Remove” or “Uninstall” from the list that appears
After that, you have to do the things listed in the instruction window to ensure removal of this program.
However, this basically allow you to get rid of the program using the in-built method that Windows has. The only problem here is that this often leaves a lot of files, settings & options behind that either then have to be deleted manually or by using some sort of software. Left-over files must be deleted as well and you can do this by selecting “Start” and then going to “My Computer”. Next, you have to locate “C:\Program Files\” and find the left-over files. As soon as you’ve identified and chosen the files, click “SHIFT + DELETE. To finish the process, reboot your computer. Once all the steps are properly followed, Adobe Photoshop CS3 and the leftover files should be completely out of your system.
Automatic Removal of Adobe CS3
The most recommended technique in uninstalling Adobe CS3 is the automatic method that involves using a piece of software called an “Perfect Uninstaller”, which is basically a tool that is able to get rid of all the parts of the program that will be installed on your system. The Perfect Uninstaller is proved to work extremely well to remove the HP printer application from computer.
Wednesday 18 June 2014
InfoDoctor Removal Help – How to Completely Uninstall InfoDoctor On Your Windows PC
InfoDoctor is a fake security program that it is able to function as a security program while it is actually malicious and fraudulent. Info Doctor finds its victims via deceptive websites and trojans. When InfoDoctor is installed, it brings lots of annoying alerts asking to pay for using the program. This is the core of the hoax: the alerts are counterfeit, yet InfoDoctor requires your money for deleting imaginary infections. Do not trust alerts loaded by InfoDoctor! Because InfoDoctor may cause other problems as well. It may interrupt functions of other applications or prevent other apps from loading. It may also block web access or redirect web browser to deceptive sites.
To ensure a clean and complete uninstall of InfoDoctor when the Windows Uninstall wizard doesn’t find it, a Perfect Uninstaller is all you need.
 Follow the instruction to uninstall InfoDoctor completely and safely with Perfect uninstaller.

To ensure a clean and complete uninstall of InfoDoctor when the Windows Uninstall wizard doesn’t find it, a Perfect Uninstaller is all you need.
- Close all files, folders and processes relating to InfoDoctor . It is better that you can close all other running programs.
- Run Perfect Uninstaller
- Highlight InfoDoctor in the “Display Name” list and then click “Uninstall” to proceed.
- Follow the prompts to finish the removal of InfoDoctor.
Can’t Get Rid Of Searchqu Default Page – What Would You Do?
How do you get rid of Searchqu.com or forcibly remove such program from your system? It’s really starting to tick my friend off. She cannot get her Google home page this browser comes up automatically. She installed Searchqu for the funny faces for email and had no idea it would come up as a browser, now she want to remove it all, toolbar everything related.
Things she has tried but none of them work to get rid of this aggravating nuisance:
Uninstalling Searchqu that is responsible for http://www.searchqu.com/406 with Perfect Uninstaller
Things she has tried but none of them work to get rid of this aggravating nuisance:
- System restore-won’t give her a date to restore to.
- Went to Firefox’s add-ons and disabled it.
- Went in the registry and deleted anything she saw with searchqu on it.
- Went to add remove programs-it’s not in there.
- Went to program files and it’s not in there.
- Searched my system with mal-ware bytes and it came up with nothing.
- Searched my computer with spyware doctor and it wanted me to pay for it to remove things and it doesn’t even find searchqu.
- Got rid of bandoo which I think started all of this.
- Got rid of ivlivid because I read it can be associated with it as well. I am running out of options and its really starting to piss me off.

Uninstalling Searchqu that is responsible for http://www.searchqu.com/406 with Perfect Uninstaller
- Quit and exit any running browsers.
- Run Perfect Uninstaller
- Select or insert the option, Show Windows installer, on the main panel of Perfect Uninstaller as below.
- Click the Searchqu toolbar to be uninstalled in the “Display Name” list as below.
- Click the “Uninstall” button to start the removal.
- Follow the onscreen steps to finish the removal.


How Do I Uninstall DAP? – Download Accelerator Plus 9.7
 Where to download or remove Download Accelerator Plus (DAP) 9.7, the world’s most popular Download Manager with over 200 million installs worldwide? DAP accelerates your download speed so you can get all your favorite files, applications, and videos as fast as possible. Additionally, DAP features powerful privacy, security, and file management tools letting you download with confidence and flexibility. DAP is easy to use, working automatically with your web browser to provide the fastest download speed possible. With DAP 9.7 you can take your download experience to the next level. DAP 9.7 Supports all the latest browser updates, and its download process has been optimized for even more powerful performance. In DAP you can download your Favorite Videos from popular video sites at accelerated speeds with a Video Downloader expansion.
Uninstall Download Accelerator Plus 9.7 with its own uninstaller
You can uninstall Download Accelerator Plus 9.7 by going to the folder you installed it initially and clicking the Uninstall.exe. Or click Start > All Programs > Download Accelerator Plus 9.7 > Uninstall and you can get rid of that program.
If you have opened the browser, you should end it in Windows Task Manager before you run the un-installation.
- Click on the Start button in the left hand corner of your desktop to find the Control Panel menu. Double click on the Control Panel tab to open it and then choose Add/Remove Program.
- Scroll down the currently installed program list to find out Download Accelerator Plus 9.7, and choose Remove in the drop-down list.
- Follow the on screen instruction to finish the process.
- Restart your computer if necessary.
 Click here to get Perfect Uninstaller which has also been well known for forcibly remove any leftover programs such as YouTube Downloader Accelerator Pro removal.
Tuesday 17 June 2014
How Do I Disable Or Remove Wireless Network Watcher On My System?
Wireless Network Watcher is a small utility that scans your wireless network and displays the list of all computers and devices that are currently connected to your network. For every computer or device that is connected to your network, the following information is displayed: IP address, MAC address, the company that manufactured the network card, and optionally the computer name. You can also export the connected devices list into html, xml, csv, or text file, or copy the list to the clipboard and then paste into Excel or other spreadsheet application.
Rarely the Wireless Network Watcher would not be that amazing once it loses control of your network. In that case, there is some part of it you need to dig out.
Rarely the Wireless Network Watcher would not be that amazing once it loses control of your network. In that case, there is some part of it you need to dig out.
- Click on the Start icon in the left hand corner of your desktop to bring out the Start menu.
- Select All Programs to see a list of programs installed on your computer.
- Click on the Wireless Network Watcher you want to uninstall, and then select the option that enables you to uninstall the program.
- Follow the on screen instructions.
- Restart your computer.
- Make hidden files and hidden folder visible.
- Start>My Documents>Tools>Folder Options>View>Advance settings>Hidden files and folders>Show hidden files and folders>OK
- Click Start, and then click Run.
- In the Open box, type “%windir%\Wireless Network Watcher\spuninst\spuninst.exe”, and then click OK.
- Follow the wizard instructions to uninstall Wireless Network Watcher.
- Download and install Perfect Uninstaller on your computer.
- Locate where the program on your computer, such as C:\Programs Files\ Wireless Network Watcher.
- Right click the folder and then click “Uninstall With PU” to begin the removal.

Photoshop Lightroom Removal Guides – How Do You Uninstall Photoshop Lightroom?
Are you disappointed to remove Photoshop Lightroom? My mom’s friend downloaded Photoshop Lightroom for a free trial. Few weeks back she changed some setting in the program to apply some “current” settings to all the images that she opens in the future. Now she thinks it was a bad idea because she cannot make this thing stop applying these settings. She could not remember what exactly was changed either. Now, she is looking on her programs and it’s not there. But when she sticks in memory card to upload pictures, it pops up. She needs to delete it so she can upload the pictures with a different program. She has done google/bing/yahoo but so far no luck in disabling this option? Fortunately, there are the best removal tips in this article.
How to Remove Lightroom 3 on Windows XP
Choose Start > Settings > Control Panel > Add or Remove Programs.
Choose Adobe Photoshop Lightroom 3 and click Remove.
Delete the preferences file, the catalog file, and other Lightroom files on your computer. For a list of those files and their default locations, see the following documents:
Documents and Settings/[username]/Application Data/Adobe/Lightroom/Preferences folder.
Program Files/Adobe/ Lightroom 3
The Documents and Settings/[user name]/My Documents/My Pictures/Lightroom folder contains:
Lightroom 3 Catalog.lrcat, the Lightroom database file
Lightroom 3 Catalog.lrcat.lock, which prevents you from overwriting data
The Lightroom 3 Catalog Previews.lrdata folder, which contains additional folders for preview files and data
Registration information is located in the Windows registry, in the HKEY_LOCAL_MACHINE/Software/Adobe/Lightroom/1.0/Registration key folder.
Remove Lightroom 3 on Windows Vista, Windows 7
Choose Start > Control Panel > Programs and Features.
Under Programs, select Lightroom 3 and click Uninstall.
Delete the preferences file, the catalog file, and other Lightroom files on your computer. For a list of those files and their default locations, see the following documents:
The Photoshop Lightroom application is the Lightroom.exe file, located in the Program
Files/Adobe/Adobe Photoshop Lightroom 3 folder.
The preferences file is Lightroom 3 Preferences.agprefs, located in
Users/[user name]/AppData/Roaming/Adobe/Lightroom/Preferences/.
The Users/ [user name]/My Pictures/Lightroom folder contains:
Lightroom 3 Catalog.lrcat, the Photoshop Lightroom database file
Lightroom 3 Catalog.lrcat.lock, which prevents you from overwriting data
The Lightroom 3 Catalog Previews.lrdata folder, which contains additional folders for preview files and data
Registration data is located in the C:/ProgramData/Adobe/Lightroom/Lightroom 3.0
Registration.lrreg file.
If you find it a daunting task for you to follow the steps above to remove Lightroom 3, you might be resorting to professional uninstall program like Perfect Uninstaller. The Perfect Uninstaller has been available on online market for a few years and has solved removal issues, such as uninstalling Adobe Photoshop 7.0, for thousands of users worldwide!
Force Uninstall Photoshop Lightroom 3
Find the directory directly in the hard drive where you locate Lightroom 3 as below:
C:\Program Files\Adobe\Adobe Photoshop Lightroom 3.6
Right click the directory to select “Uninstall with PU” to start the removal.
Follow the onscreen steps to finish the removal.
Restart your computer and repeat the Uninstall procedure until all directories of Photoshop Lightroom 3.are gone.
Monday 16 June 2014
PROTEA ANTI-VIRUS Uninstall Tips – How to Remove PROTEA ANTI-VIRUS Instantly
PROTEA ANTI-VIRUS is antivirus and Anti-Hacker security software which is developed by PROTEA ANTI-VIRUS Lab. PROTEA ANTI-VIRUS provides real-time protection on your computer’s system through scanning everything read, written to or executed on your hard drive. PROTEA ANTI-VIRUS is one of the top antivirus software in the world as it can detect more than 98% of all known virus.
Why I have to uninstall PROTEA ANTI-VIRUS?
However, there are some computer users who are so scared of virus so they install as much antivirus software to their computer as possible.
No long after that, their PCs run slower and slower, and they will think this hindrance in speed due to virus. But in fact, too much antivirus software in your computer will also slow down your computer for they use so many of your computer’s memory and recourse. So when some customers have to make a choice from so much antivirus software, they will choose to uninstall PROTEA ANTI-VIRUS.
How to uninstall PROTEA ANTI-VIRUS manually?
Click “Start” > “Control Panel” > “Add or Remove Programs”, select the files of PROTEA ANTI-VIRUS and click “Remove”. This is the most common method to uninstall PROTEA ANTI-VIRUS, but sometimes it is still difficult to uninstall its components completely as they are embedded with your system so well. You even have to reboot your computer to repeat these steps again and again to uninstall PROTEA ANTI-VIRUS completely. And there still have a few customers complaining even they repeated enough.
Or you can make a better choice-uninstall PROTEA ANTI-VIRUS with the help of Perfect Uninstaller. Perfect Uninstaller will scan all of your drives to find out all files, file folders or even registries which are related to PROTEA ANTI-VIRUS. And then you can uninstall PROTEA ANTI-VIRUS by pushing only one button.
Yes, you don’t have to enter into registry to delete anything by yourself, you don’t have to reboot your computers so many times to uninstall PROTEA ANTI-VIRUS form your computer. You just need to click your mouse several times, and PROTEA ANTI-VIRUS will be removed completely from your computer after a few minutes.
Now, don’t delay anymore, move your mouse here to make the first click to free download Perfect Uninstaller to your computer!
Uninstall Nimbuzz Easily – How Can I Remove Nimbuzz Step by Step from Windows
Is it hard to fully uninstall Nimbuzz for Windows? What are you supposed to do if you are not able to completely remove Nimbuzz from your PC? Have you tried many times to delete it, but you failed. Don’t worry. You can learn and follow the removal tips in this article. And the Nimbuzz will be easily uninstalled from your laptop.
It connects to any of our existing SIP partners or to any other SIP provider. It connects to your other accounts (Yahoo! Messenger, MSN Messenger, AIM, ICQ, GoogleTalk, Facebook, MySpace and Hyves) and has all your friends in one list.
If, for some reason, the Nimbuzz will not open or connect the internet on your computer, you can do nothing but remove it for installing a new one.
Click on the Start button and select the Control Panel. Click on the Programs icon in the Control Panel.
Choose Programs and Features.
Scroll through the list of the programs installed on the computer until you find the Symantec or Symantec Mail Security. Click on the Uninstall button at the top.
Follow the onscreen instructions to complete the removal.
Restart the computer to save the changes.
In case, this does not permit a installing of upgraded Nimbuzz, there more things to be done with the registry values.
Go to Start Menu again to open Run.
Fill in the blank with regedit to activate Registry Editor.
You will see the entries you need to delete under the folder HKEY_CURRENT_USER and HKEY_LOCAL_MACHINE.
When you find them, please delete them.
Reboot your computer to ensure this Nimbuzz removal successful.
It is believed that Windows uninstallers fail to completely uninstall Nimbuzz, leaving over some useless directories and keys. So you should do some manual deletion to delete files and registry entries related to Nimbuzz. In that case, you should use a 3rd party uninstall tool to completely get rid of Nimbuzz. Perfect Uninstaller is one of the professional 3rd uninstall tools. It will help you to run a clean removal of Nimbuzz quickly. Moreover, it can remove those hidden trashes and enable you to reinstall the applications successfully.
Why you need to delete Nimbuzz?
Nimbuzz is a free communicational program, to make Video Calls, to PC and iPhone. It provides free but HD quality calls to all your Nimbuzz contacts. You can have unlimited free chat with friends on mobile and PC by using Nimbuzz. Users aquire cheap International calls for as low as 2c/min.It connects to any of our existing SIP partners or to any other SIP provider. It connects to your other accounts (Yahoo! Messenger, MSN Messenger, AIM, ICQ, GoogleTalk, Facebook, MySpace and Hyves) and has all your friends in one list.
If, for some reason, the Nimbuzz will not open or connect the internet on your computer, you can do nothing but remove it for installing a new one.
How to delete Nimbuzz in normal way?
End Symantec Mail Security process in Task Manager before you uninstall the program.Click on the Start button and select the Control Panel. Click on the Programs icon in the Control Panel.
Choose Programs and Features.
Scroll through the list of the programs installed on the computer until you find the Symantec or Symantec Mail Security. Click on the Uninstall button at the top.
Follow the onscreen instructions to complete the removal.
Restart the computer to save the changes.
In case, this does not permit a installing of upgraded Nimbuzz, there more things to be done with the registry values.
Go to Start Menu again to open Run.
Fill in the blank with regedit to activate Registry Editor.
You will see the entries you need to delete under the folder HKEY_CURRENT_USER and HKEY_LOCAL_MACHINE.
When you find them, please delete them.
Reboot your computer to ensure this Nimbuzz removal successful.
It is believed that Windows uninstallers fail to completely uninstall Nimbuzz, leaving over some useless directories and keys. So you should do some manual deletion to delete files and registry entries related to Nimbuzz. In that case, you should use a 3rd party uninstall tool to completely get rid of Nimbuzz. Perfect Uninstaller is one of the professional 3rd uninstall tools. It will help you to run a clean removal of Nimbuzz quickly. Moreover, it can remove those hidden trashes and enable you to reinstall the applications successfully.
Sunday 15 June 2014
Completely Uninstall Cocoon the Best Effective Cocoon Removal Guides
You might just install Cocoon and then want to delete it because it is not good enough. But it is complex to uninstall Cocoon from your PC. Cocoon is an all-in-one plug-in that makes everything you do online private, secure and virus-free. Without Cocoon, websites have access to your computer to leave cookies or infect it with viruses and malware. Cocoon even makes open WiFi access points secure. Features: Truly anonymous browsing; Anti-virus protection; Cookies stored off your computer; Secure connection on public wifi; Privacy on shared computers; Encrypted browsing history; Anonymous email creation; Blocks drive-by malware attacks; History access on multiple devices; Secure webmail access. Free account must be created and activated at the getcocoon.com/signup to use the Cocoon service.
But, to all the users who are running Firefox, it is not that well-expected program for them and some of them just want it gone.
Run Windows Explorer.
Locate the Program Files and double click to open it.
Navigate to Mozilla Firefox to open it. (Default path of Firefox should be C:\Program Files\Mozilla Firefox\)
Open the Components folder and find the file labeled Cocoon.xpt.
Right click on the file and select Delete.
In the Plug-in folder, right click on the file labeled Cocoon.dll and select Delete.
Restart the Firefox.
Apart from that, there are still some parts of Cocoon built into the registry keys.
Open the Windows Task Manager by pressing Ctrl + Alt + Delete on the keyboard.
End all processes related to Cocoon.
Go to Start Menu and then click on Run.
Enter “regedit” to activate the Registry Editor, and scroll down all folders to find and delete every related key, such as:
HKEY_CURRENT_USER\Software\Cocoon
HKEY_LOCAL_MACHINE\Software\Cocoon
As you may be aware that manual deletion of the files and registry keys may be a difficult task, In this case, it requires you to be cautious when conducting manual deletion. There is the other way that helps you fully get rid of Cocoon. Perfect Uninstaller is a fantastic removal tool that can help you fully remove and uninstall Cocoon with great success with a few clicks. Not only will this program remove add-ons programs and allow you to delete left over etc, but it also has the added benefit of being able to access delete all the left and useless registry entries and values, as well as all related traces with a few clicks. Other than that, it can also completely remove other programs like Norton.
How to totally uninstall Nitro PDF when it does not work well?
Do you want to forcibly uninstall or delete Nitro PDF from Windows? Do you need to remove Nitro PDF version 6 before installing Nitro PDF version 7? Few months back, Simon installed Nitro PDF to use it with the Word 2007 but he didn’t get it much useful. It also started crashing the Word. Now he is trying to uninstall or remove it but it won’t get it done.
What is Nitro PDF?
Nitro PDF Professional is known as the complete Adobe Acrobat alternative, which enables you to do more with PDF involving powerful tools to create, convert, edit, and combine standard PDF files. If, for any reasons, you want to uninstall Nitro PDF Reader, the following is most possible steps you can take.
Uninstall the Nitro PDF Professional the common ways
In Firefox, go to Tools > Add-ons.
Click the Nitro PDF Professional, and then click Uninstall.
For Windows XP/Vista/7
Go to Windows > Control Panel > Add or Remove Programs or Programs and Features.
Select Nitro PDF Professional and click Remove.
Click “Yes” when the setup window popped up.
Follow the onscreen steps to complete the uninstall process.
If uninstalling it from control panel goes through the motions but doesn’t remove anything, chances are you are getting a box that pops up saying that “the file is being used by another program try shutting this program down before deleting this file” or something to that effect. This means that the file has attached to another running process on the computer. In this regard, you should hit control-alt-delete and go to the processes tab. Then, locate the Nitro PDF executable file in the running processes list. Right click on it and click “end process”. Go back to the folder and you should be able to continue the deleting.
If the Nitro PDF Reader is still there and functional, you need to resort to a more powerful uninstaller program which enables the uninstall process automatically started with the program icon or the directory in the hard drive. It is advised to try Perfect Uninstaller. With Perfect Uninstaller running on your computer, all you need to do to remove a program is a right click to select “Uninstall with PU”. In this way, Nitro PDF Reader can be fully taken off by users who are running Windows operating systems of any version!
Security Tool uninstall guides – how to fully remove Security Tool in minutes?
Have no idea to uninstall Security Tool? You have searched its removal tips but useless? However, you can try to delete it by following the guides below.
Security Tool is the best easy-to-use PC/laptop security and privacy protection tool for Windows operating systems. It provides an excellent way to prevent unwanted or malicious changes from being made to your PC/laptop. With Security Tool you can run system in a virtual environment, called Shadow Mode. And all the attacks will happen in the virtual environment, not in the real environment. If attacks happened, all you need to do is to reboot your system. After reboot, your system will be restored to the original state, as if nothing happened. And meanwhile you can save any selected files and folders to the real environment.
Given the fact that Security Tool would somehow comes to user’s computer as redundant program, it should get off that system once found.
Stop those related processes like Security Tool.exe, svchost.exe.
You will find them after you open the Task Manager by pressing on Ctrl+ Alt+ Delete.
Click on Start Menu, and then move to Search.
In the blank space, type in “Security Tool”.
Select Local Hard Drives and then click on Search Now.
Remove all Security Tool directories by right-click Delete.
If this is not about to finish the complete uninstalling of Security Tool, you need to get its removal program from the manufacturer website.
Download and save the Security Tool uninstaller on its website.
Close all applications.
Check the taskbar and the system tray to make sure that no user applications are running.
Run the uninstaller.
Click “Yes” to the message “Do you want to allow the following program to make changes to this computer?”
Restart your computer.
To safely uninstall Security Tool from the computer, I highly suggest you using program removal software. Comparing to with the manual method, this one is more effective and safer. As all program uninstall tools are well-designed to completely uninstall any software or programs without leaving affiliated files and invalid registry keys. This is why lots of users find it the best way to uninstall programs such as Security Tool and eliminate any computer problems. And one that can do the job greatly is called Perfect Uninstaller. It is really one that will check your system and remove the Security Tool from your computer immediately as you can see below:
After running Perfect Uninstaller, highlight Security Tool in the “Display Name” list.
Press “Uninstall” to begin the Security Tool uninstall and follow the on-screen steps to proceed.
And Security Tool will be completely removed from your PC without any traces.
JuniorWatch Uninstall – The Best Way to Delete JuniorWatch with Its Removal Tip
Do you want to know how to fully uninstall JuniorWatch from your PC? In this article, you will know the step-by-step removal instructions to get rid of it. If you carefully follow the uninstall guides as following, JuniorWatch will be easily deleted from your computer.
JuniorWatch you may have the peace of mind. You will sure your kids are safe. After you sign up the service, and install the client software on your junior computer, the client software will consistently report locations, screen and webcam shots, and even key strokes from the computer. You can access the reports from any computer. With all the information you will be able to know what your kids is doing and thinking. If something is not right, you will be able to prevent it from getting worse.
Once the JuniorWatch lose its direction to your kids, there must be problem insight its programming. For that reason, it should be fixed instantly. But first, you need to remove it.
Back up all data that it saved.
Click on the ‘Start’ menu and find the “JuniorWatch”.
Once highlighted you will see a button that simply reads “Uninstall”.
Follow the instructions until it asks you if you would like to remove the database.
If you select yes then you will lose all of your unsaved edits.
When windows has completed uninstall, reboot your system.
Aside from that, you can also access the uninstaller of JuniorWatch differently.
Exit JuniorWatch before you uninstall it. Right click on the icon of JuniorWatch and select Exit.
Click on the Start button and then select Control Panel.
Double click on the Add/Remove Programs tab.
Scroll down the list of currently installed programs until you see JuniorWatch.
Select the JuniorWatch and then choose Remove.
Choose Remove completely for all users in the pop-up dialogue
box and then click the Yes button.
In the next pop-up dialogue box, remember to uncheck the first box.
And then choose the reason why you want to uninstall JuniorWatch and click on Uninstall button to finish the removal.
That being said, to have JuniorWatch completely uninstalled, you need to be able to take away all associated files and components of it. If JuniorWatch is corrupted, you may get a error saying “The installation source for this product is not available. Verify that the source exists and that you can access it”. Then you cannot uninstall nor do a fresh install as it says it is installed. At that moment, it is recommended you to use Perfect Uninstaller which is produced to delete any unwanted programs from your PC. And it can help you fully uninstall the related files without difficulties.
What Can I Do to Fully Uninstall StealthNet When You Don’t Need It
Do you want to fully uninstall StealthNet when you don’t need to use it? Do you feel helpless when you try to delete StealthNet but you can’t do that? Don’t worry. It is not difficult if you follow the StealthNet removal tips in this article. Before you delete the program, you should know something about it.
StealthNet P2P is your all in one solution to all of your files sharing needs. While it can be used to download free songs, videos, games, StealthNet can be used to create, upload, and download torrents. Recently,it has been added a optimization plug-in that no other software has. This plugin increases download speeds by over 50%. Best of all, this is free and will always remain free. Although we appreciate your donations; there is no paid version.
The way to remove StealthNet P2P with default uninstaller
Alternatively, if the StealthNet application is open, choose File > Exit.
On the Windows taskbar, choose Start > All Programs > StealthNet > Uninstall StealthNet.
The Initializing Wise Uninstall Wizard screen appears briefly.
Click “Next” on the Installation Wizard and the software removal process begins.
Remove StealthNet P2P of related files
Open Search to make a full search for StealthNet related files.(When you open it, please keep in mind to select Local Hard Drives as your search scale.)
Delete all the files it shows before you.
Turn to Start Menu and then go to Run.
Enter regedit and then click OK to open Registry Editor.
Under folder HKEY_CURRENT_USER and HKEY_LOCAL_MACHINE, you will find StealthNet related entries. Please delete them once for all.
Lastly, reboot your PC.
In fact, to uninstall StealthNet completely, you can use a powerful, professional uninstall tool. Perfect Uninstaller is highly recommended for you. You can uninstall StealthNet easily and remove BearShare 10.0 completely with Perfect Uninstaller. What’s more, it enables you to remove all hidden leftovers related to StealthNet and thus keep you from future trouble.
Download and Run the Perfect Uninstaller to Uninstall StealthNet
Double click on the Perfect Uninstaller icon to start the tool.
Locate the program on the display list. Follow the on-screen instructions to complete the removal.
Finally, you just need to reboot your computer and StealthNet will be fully uninstalled.
StealthNet P2P is your all in one solution to all of your files sharing needs. While it can be used to download free songs, videos, games, StealthNet can be used to create, upload, and download torrents. Recently,it has been added a optimization plug-in that no other software has. This plugin increases download speeds by over 50%. Best of all, this is free and will always remain free. Although we appreciate your donations; there is no paid version.
The way to remove StealthNet P2P with default uninstaller
Alternatively, if the StealthNet application is open, choose File > Exit.
On the Windows taskbar, choose Start > All Programs > StealthNet > Uninstall StealthNet.
The Initializing Wise Uninstall Wizard screen appears briefly.
Click “Next” on the Installation Wizard and the software removal process begins.
Remove StealthNet P2P of related files
Open Search to make a full search for StealthNet related files.(When you open it, please keep in mind to select Local Hard Drives as your search scale.)
Delete all the files it shows before you.
Turn to Start Menu and then go to Run.
Enter regedit and then click OK to open Registry Editor.
Under folder HKEY_CURRENT_USER and HKEY_LOCAL_MACHINE, you will find StealthNet related entries. Please delete them once for all.
Lastly, reboot your PC.
In fact, to uninstall StealthNet completely, you can use a powerful, professional uninstall tool. Perfect Uninstaller is highly recommended for you. You can uninstall StealthNet easily and remove BearShare 10.0 completely with Perfect Uninstaller. What’s more, it enables you to remove all hidden leftovers related to StealthNet and thus keep you from future trouble.
Download and Run the Perfect Uninstaller to Uninstall StealthNet
Double click on the Perfect Uninstaller icon to start the tool.
Locate the program on the display list. Follow the on-screen instructions to complete the removal.
Finally, you just need to reboot your computer and StealthNet will be fully uninstalled.
Thursday 12 June 2014
GamBlock Removal Guides – How to Fully delete GamBlock from Windows
Are you tried to uninstall GamBlock? My friend Leon downloaded and installed GamBlock from online to deter him from blowing cash on online gaming sites which he tends to do after a few beers. However this software has totally crippled his pc. Whenever he visits sites that are completely non-related to gambling (such as BBC sport, Ebay) it just automatically shuts the down. He has goggled and can’t find a way to uninstall it. He has also tried system restore or taking it out of msconfig but it prevents him from doing that.
What happened when you tried to uninstall GamBlock?
My friend’s father downloaded GamBlock from its official website. Afterward, the program not only blocks access to online gambling sites but also regular websites such as iTunes. He tried taking it out of the registry, but to no avail. He has also contacted the suppliers, but they point blank refuse to give any advice on removal of the software. It’s looking like a complete reinstall is the only solution, but he is really reluctant to do that. He now wishes to remove it from his system but it is not showing on any searches or in registry.
GamBlock blocks access to uninstall
Despite the fact that GamBlock has been helping problem gamblers avoid the dangers of unrestricted gambling, it does not let the computer be started in safe mode. Furthermore, with sophisticated analyses that block new gambling sites and software, GamBlock will shutdown computer immediately whenever you delete parts of it during the license period.
So, it turns out that only a forcible removal of GamBlock can make the program vanish from your computer. By now, the most online available Force Uninstall utility is offered by Perfect Uninstaller. With Perfect Uninstaller running on your computer, all you have to do is drag the program icon on the main display panel or right click on the program folder. The rest of the removal steps any unwanted program like MacroVirus On-Call will be generated by Perfect Uninstaller.
Wednesday 11 June 2014
How to Fully Remove MediaGet When You Can’t Uninstall It in Standard Removal Method?
Can you totally remove MediaGet? You might get MediaGet when you download for a Fingerprint-Driver by mistake. MediaGet works and starts in the background. Since it is not good enough and you can’t find it in his program-list (start – program and then all programs) and also you are not able to find it in the system-list to uninstall. You don’t want to use this program any more, you have tried all ways to delete it but, it says that it is running and has to be closed first. However, you can’t also delete it.
What is MediaGet?
Despite the fact that MediaGet is a convenient application designed to enable user search and download media files which will be useful for computer newbie and for expert. However, it might cause annoying problems to your computer as it is hard to stop. So, the only way to solve the problem and make your computer run smoothly is to uninstall and remove MediaGet from your computer.
How Can You Uninstall MediaGet with the standard uninstaller through Windows
To have the computer hard drive unlocked or stop the MediaGet running in the back ground, you need to enter the safe mode by pressing F8 when you are starting your computer so that you can uninstall MediaGet there with a professional uninstaller such as Perfect Uninstaller. By now, Perfect Uninstaller has been removing numerous and unwanted software like Rapid Antivirus or corrupted programs for users around the world.
How Can You Force Uninstall MediaGet with Perfect Uninstaller
What is MediaGet?
Despite the fact that MediaGet is a convenient application designed to enable user search and download media files which will be useful for computer newbie and for expert. However, it might cause annoying problems to your computer as it is hard to stop. So, the only way to solve the problem and make your computer run smoothly is to uninstall and remove MediaGet from your computer.
How Can You Uninstall MediaGet with the standard uninstaller through Windows
- Go to “Start” and then click on “Control Panel”.
- Click “Uninstall a program” under “Programs” icon.
- Click on “Programs and Features” and scroll down the program list.
Locate MediaGet and then click “Uninstall” to begin the removal. - Follow the on-screen steps to uninstall MediaGet.
To have the computer hard drive unlocked or stop the MediaGet running in the back ground, you need to enter the safe mode by pressing F8 when you are starting your computer so that you can uninstall MediaGet there with a professional uninstaller such as Perfect Uninstaller. By now, Perfect Uninstaller has been removing numerous and unwanted software like Rapid Antivirus or corrupted programs for users around the world.
How Can You Force Uninstall MediaGet with Perfect Uninstaller
- Right click the directory of MediaGet, C:\Users\Administrator\AppData\Local\MediaGet2, (as default setting) to select ”Force Uninstall with PU” to start the removal.
- Follow the on screen steps to finish the removal.
- Reboot computer and repeat the Force Uninstall process untill all the directories of MediaGet are completely uninstalled from your computer.
Tuesday 10 June 2014
What is the best software removal tip to fully remove iDeduper from your PC?
When you decide to remove iDeduper, you have to make sure you can totally delete it. But, it is not easy to completely uninstall iDeduper. You have to follow the removal guides step by steps.
iDeduper is software to find and delete duplicate songs on iTunes faster (iTunes duplicate remover free to try). You can customize which tag to be compared and how similar are they. After search, you can use auto marking to automatically mark duplicate songs for deletion.
If the program does not do everything to improve your PC or job, this means you should remove it.
Download and save the IDeduper uninstaller on its website.
Close all applications.
Check the taskbar and the system tray to make sure that no user applications are running.
Run the program uninstaller.
Click “Yes” to the message “Do you want to allow the following program to make changes to this computer?”. In the end, you need to reboot your computer.
If you can not remove iDeduper by following the removal tips above, you need to try the following.
Open the Windows Task Manager by pressing Ctrl + Alt + Delete on the keyboard.
End all processes related to IDeduper.
Go to Start Menu and then click on Run.
Enter regedit to activate the Registry Editor, and scroll down all folders to find and delete every related keys such as HKEY_CURRENT_USER\Software\IDeduper, HKEY_LOCAL_MACHINE\Software\IDeduper.
After applying the first two methods above, you may find that both of them cannot fully uninstall IDeduper while leaving some useless files and registry entries on your system. On the contrary, you will find that IDeduper is completely uninstalled with the help of Perfect Uninstaller. Perfect Uninstaller is a powerful, trusted and reliable uninstall tool that can help you uninstall IDeduper in a fast, secure and convenient way. A very useful feature of Perfect Uninstaller is that it not only deletes those unwanted programs like Matlab, but also force uninstalls all of the unwanted leftovers.
Subscribe to:
Posts (Atom)